As an RV owner, it’s important to know how to properly use an RV dump station to dispose of waste and keep your tanks clean and sanitary.
What You’ll Need
- Protective gloves
- RV sewer hose kit
- Sanitizing spray and paper towels
- Garbage bag (In case the dump station doesn’t have a garbage bin)
- Safety glasses (Optional)
- Face mask (Optional)
Step 1: Find an RV Dump Station
So, where can you dump RV waste? We have three convenient options to help you find an RV dump station right on this site:
- Check out our RV dump station locator to find a dump site near you.
- Download our RV dump station directory to view our entire dump station list (11,000+ stations) on your computer or mobile device – even in areas without WIFI.
- Use our interactive map of RV dump stations to find the nearest location.
Check the hours of operation and any fees associated with using the dump station.
Step 2: Pull Up to the Dump Station
When you arrive at the dump station, position your RV so that the dump valves are lined up with the dump station inlet.
Tip: The closer, the better! You never want the sewer hose to be taut. If it’s completely stretched out, it may pop off the dump station inlet when pressurized.
Step 3: Put on Your Safety Gear

It’s highly recommended to wear safety gear when preparing to empty your RV’s waste water tanks at a dump station. Rubber gloves will protect your hands from coming into contact with any waste materials, while safety glasses will protect your eyes from splashes or spray.
Optionally, wearing a face mask can protect you from inhaling any odors or potential waste splashing near your mouth.
So, now is the time to suit up and prepare for the job ahead!
Step 4: Connect Your Sewer Hose
Important: Before proceeding, ensure your RV’s black and grey tank valves are closed!
- Remove your sewer hose from storage and connect it to your RV’s sewer tank outlet. Ensure it is fully connected.
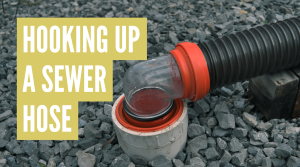
- Next, connect the other end of the hose to the dump station inlet. If a metal lid covers the inlet that flips up, rest it on top of the sewer hose connector to help hold it in place.

Step 5: Dump the Black Water Tank First
It’s important to always dump the black water tank before the gray water tank. The grey water will help clean out the sewer residue from the hose left by the back tank.
- Open the black tank valve slowly to allow the waste to flow out. While the waste is flowing out, ensure there are no leaks.
- Allow the waste to completely empty out of the tank. This can take several minutes.
Tip: Use a clear elbow connector so you can easily tell when the tanks are emptied.
Optional: Flush the Black Tank

- Locate the flush port on your RV. It’s typically located on an outside wall next to the city water connection. See the image above. Consult your owner’s manual if you are having trouble locating it.
- Connect a standard hose to the flush port and a nearby water source. Do NOT use your RV’s freshwater hose for this purpose, as you don’t want to potentially contaminate your fresh water supply.
- Before turning on the water, ensure your black tank valve is open.
- Turn on the water at the spigot and let it run through your black tank and out your sewer hose for 2-3 minutes or until all the water coming out is clear. Again, this is where having a clear sewer hose adapter comes in handy.
- Turn off the water and disconnect the garden hose. You’ll notice the water will continue draining out of your sewer hose for a few minutes. Once that is done, close the black tank valve.
Step 6: Dump the Gray Water Tank
Once the black water tank is empty, you can move on to the gray water tank.
- Open the valve slowly to allow the gray water to flow out.
- Allow the tank to empty completely.
- Once empty, close the tank valve.
Step 7: Clean & Disconnect the Hose From Your RV
- Disconnect the sewer hose on the RV side and replace the drain cap, ensuring it’s on tight.
- Lift that end of the sewer hose up high so any remaining wastewater will drain into the dump station inlet.
- Spray out the sewer hose with water and allow it to completely drain into the dump station inlet.
- Remove the sewer hose from the dump station inlet.
Tip: Connect the sewer hose to itself (lock both ends together) to keep it from dripping.
Step 8: Store Your Equipment
Place your sewer hose, adapter, and any other equipment in their designated storage place. I personally put my sewer hose and elbow adapter in a plastic storage bin. Some RVs have built-in storage for the hose in the bumper or other compartments.
Once your equipment is properly stored, remove your gloves and throw them in a garbage bin.
Step 9: Leave the Dump Station
Lastly, pull away from the dump station (so the next person in line can use it) and find a place to park. Always follow proper dumping etiquette and be mindful of those waiting in line to use the dump station.
Now, you’ll need to fill up your black tank about 10% with water. You can do this with a 5-gallon bucket or by flushing the toilet four to five times.
Then add some black tank cleaner to the tank, and you’re good to go!
By following these steps, you can use an RV dump station safely and efficiently!


Write a comment