Camper FAQs is reader-supported. Buying through links on our site may earn us an affiliate commission. As an Amazon Associate I earn from qualifying purchases.
Winter RV camping offers a unique experience but also a unique challenge – keeping your RV pipes from freezing. Cold weather can wreak havoc on your RV’s plumbing system, leading to costly repairs.
Below, we cover our best tips to ensure your RV water lines, holding tanks, and other plumbing components stay functional during your winter camping trip.
How to Keep Your RV Pipes From Freezing
1. Park in the Sun
The first step in preventing your RV pipes from freezing is choosing a campsite with ample sunlight. Sunlight can naturally warm the underbelly of your RV and help maintain a higher ambient temperature around your plumbing system. This is an easy way to use natural heat to your advantage and reduce the risk of freezing.
2. Open Cabinet Doors
One of the most straightforward methods to prevent freezing is to open the cabinet doors under your sinks. This allows warm air from the living space to circulate the pipes. Especially during the night when outdoor temperatures drop, keeping cabinet doors open can make a significant difference in keeping your RV’s water system from freezing.
3. Insulate & Heat Your RV Pipes
Insulating your RV water pipes is a great way to add an extra layer of protection against cold temperatures and is even more important if you are using city water to supply your RV.
Insulating your RV water pipes is a great way to add an extra layer of protection against cold temperatures. Foam insulation is often the best material for this purpose. You can purchase pre-cut foam insulation tubes from a hardware store to fit over your pipes, and they even make foam insulating tape.
And don’t forget about your city water hose. To wrap your water hose, you will need:
Then apply the insulation as follows:
- Start by laying the hose on the ground and ensure it doesn’t have any kinks.
- Run the heating cable or tape down the length of the hose so the heat cable’s plug and thermostat don’t form part of the wrap. Attach the cable and hose at intervals of one foot using tape.
- Wrap the hose-cable pairing in insulation with the heat cable thermostat and plug hanging out at the end. Don’t insulate the thermostat with the hose and cable, as you’ll want the thermostat to switch on the cable when the temperature drops below a set point.
- Lastly, cover the insulation wrap with all-weather tape to protect it.
Tip: When your exterior hoses are not in use, store them in your RV to limit exposure to the elements and prevent hose deterioration and damage.
A simpler option would be to use a heated water hose.
Camco TASTEPure Heated Drinking Water Hose
Price:Clicking this link to make a purchase may earn us a commission at no additional cost to you.
We cover this topic extensively in our guide on how to keep your RV water hose from freezing.
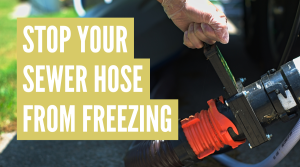
Tip: Don’t forget to insulate your sewer hose if you leave it connected! Check out our 3-step guide on how to keep your RV sewer hose from freezing to prevent it from becoming brittle and cracking.
4. Insulate Your RV Storage Bays
Some campers have heat ducts that run to their storage bays that help keep the temperature above freezing and prevent damage to any pipes or components in that area. This is common in “four-season” campers or RVs with a “winter package.”
That said, these storage bays are often less insulated than the living space, making them susceptible to cold air. Adding extra insulation like foam board can help maintain a warmer temperature in these areas.
5. Heat the Storage Bays
For those with RVs not designed for all four seasons, using an electric heater in the storage bay can be a viable alternative. This can help maintain a temperature above freezing, protecting pipes and other sensitive items stored in the bay.
Just make sure to follow all safety guidelines when using an external heat source in your storage bay.
6. Skirt Your RV
RV skirting is a great way to block cold air from entering the underbelly of your RV. Skirting materials can range from insulation boards to specialized RV skirting kits. The skirt acts as a barrier against wind and cold air, helping to keep your RV’s pipes and holding tanks from freezing.
Tip: Vinyl is arguably the best material for skirting, as it lasts for years and is easy to install. Vinyl is also an excellent insulator.
7. Use the RV’s Fresh and Waste Water Tanks
Using your RV’s onboard freshwater tank and wastewater tanks, rather than connecting to an external water source, can reduce the risk of freezing. This is because the onboard tanks are generally located in areas that benefit from the RV furnace’s ambient heat.
Tip: Ensure your water tanks are always at least 25% full. The water in an almost empty tank is more likely to freeze, and the ice can clog your valves and hoses.
8. Move to a Warmer Location
Obviously, this isn’t always possible, especially if you are choosing to camp in freezing temperatures. But moving to a warmer location is a surefire way to avoid frozen pipes. Even a few degrees can make a difference, so consider this option if you have the flexibility to move.
9. Install Tank Heating Pads
Just like the plumbing in your RV, the contents in your holding tanks can freeze, too. This can cause substantial damage to your tanks and any plumbing connected to them that is costly to repair.
Tank heaters are an excellent investment for winter RV camping. This type of heater is an electric blanket you can attach directly to your black tank, gray tank, and fresh water tank to keep the water temperatures from dropping below zero.
Facon 12″ x 18″ RV Holding Tank Heater Pad
Price:Clicking this link to make a purchase may earn us a commission at no additional cost to you.
Tip: Add some RV antifreeze to your holding tanks after every time you empty them if you don’t plan to install heating pads.
10. Use a Thermostat
Monitoring the temperature in areas where your RV plumbing is located can help you take timely action to prevent freezing. A thermostat can alert you when temperatures approach freezing, allowing you to activate heat sources or take other preventive measures.
My RV Pipes Froze! Now What?
If you find that the pipes or hoses on your RV have frozen, it’s important to act quickly to mitigate damage and restore functionality.
Here are some steps to deal with frozen RV pipes and hoses:
1. Assess the Situation
The first thing to do is to assess the extent of the freezing. Check all water lines, hoses, and tanks to identify which areas are affected. Turn off the water supply to prevent further complications.
2. Use Safe Heat Sources to Thaw Frozen Areas
- Hairdryer: A hairdryer can be used to gently thaw frozen pipes. Move the hair dryer back and forth along the frozen area, taking care not to overheat any single spot.
- Heat Gun: Similar to a hair dryer but more powerful, a heat gun can be used for quicker thawing. Exercise caution, as heat guns can get very hot and potentially damage the pipes if not used carefully.
- Hot Water: Pouring hot water over the frozen area is another effective way to thaw pipes. Make sure to capture the water as it cools for reuse to conserve water.
- Electric Heater: A small electric space heater can be placed near the frozen area to gradually thaw it. Ensure the heater is set on a stable surface and away from flammable materials.
- Heating Cable: If you have a heating cable or heat tape, wrap it around the frozen pipe to gradually thaw it. Always follow the manufacturer’s guidelines for safe use.
3. Inspect for Damage
Once the pipes have thawed, inspect them for any cracks or damage. Frozen water expands and can cause pipes to crack, leading to leaks.
4. Test the System
After thawing and inspection, turn the water pump back on and check for proper flow through all faucets and fixtures. Make sure there are no leaks, and that water is draining correctly into the gray and black water tanks.
What Happens if RV Pipes Freeze?
If the pipes in your RV freeze, you could face a range of problems that go beyond the inconvenience of not having running water.
The expansion of frozen water can crack or even burst pipes, leading to potential water damage inside the RV. This can also result in costly repairs, including replacing damaged pipes, fixtures, and possibly even the water pump.
Additionally, frozen pipes can disrupt the functionality of your waste systems, compromise the quality of your water supply, and may require you to temporarily vacate the RV for repairs.
Overall, frozen pipes can lead to significant disruptions, financial costs, and long-term damage if not promptly addressed.
At What Temperature Will Pipes Freeze in a Camper?
Generally, the temperature has to drop below 32°F for 24 hours before the water in your RV pipe will freeze. That said, several factors determine the temperature at which your RV pipes will freeze, including the insulation you have in place, the type of piping you have, whether you use a heat cable, and the temperature change rate.


We are planning our first camping trip this winter! Thanks for these suggestions.
Enjoy your trip!
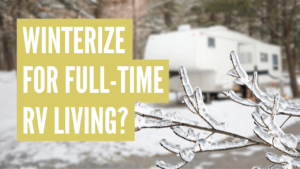
I live in Washington state and I’m considering moving into an RV full time. The thought of winterizing an RV while living in it was overwhelming and I thought it would cost a fortune and be way over my head. All of these ideas are very reasonable! Thank you for making this less scary.
You’re welcome! We’re here to help if you run into any issues.